Amazon Freetime Unlimited Review for 2018

It’s been a while since I’ve taken a real hard look at the content and apps my kids have been consuming. We always keep an eye out for anything crazy, but I also like to get them interested in content I know is good for them and obviously safe from things they shouldn’t be seeing. I recently took a second look at getting them signed up for the Amazon FreeTime Unlimited so they can consume on their iPads.

Much to my dismay, the service is only available on fire tablets, fire tv and android devices. It’s been becoming a bit of a hassle trying to get the kids a single platform that they can use for most activities. It seems like there is always some politics involved with what service is available on what. From a parents point of view, I wish everyone just got along.

However the good news is, I recently got my kids into Osmo and they have loved it. My secret parent goal is to trick them into liking programming. Math, Puzzles, and some creativeness keeps them engaged pretty well. Osmo isn’t the entire good news, since it runs on the iPad though. The good news is I’m secretly graduating them to start working on Raspberry Pis.

There are a couple cool coding for kids books for the Pi I’d like to get them involved with (like this one) and since they will each have their own Raspberry Pi I can also load android OS onto it so that they can consume Amazon FreeTime. This might be something I need to figure out how to dual boot though… or hopefully they can figure it out.

Sorry about my rant, but ultimately this post was to reach out to other parents to see how the service is and if its worth the hassle of setting up other devices. I will still go and set it up myself just so I can take a look and will give a solid review around Amazon FreeTime. I’ll give two sides to the review, the parent features and the things the kids like about it. Let me know below in the comments if you are using it and what you like or dislike about it.

Why you should update your iPhone right now!

If you are an iPhone owner and have been holding off on updating your phone for whatever reason, now is the time to update it. A new exploit called “Broadpwn” has been discovered leaving iPhones, iPads, and the iPod touch vulnerable to this new exploit.

A hacker may easily compromise a local router or an IoT device to launch the exploit and without any interaction on your phone you can quickly become a victim of whatever code the hacker would like to execute. So before reading on, go ahead and update to the latest version of iOS (currently 10.3.3 as of this writing)

The good news is this attack must be executed within the wifi range of you device and is referred to as a proximity attack. The hacker would be unable to launch the exploit unless he is close to your devices. Essentially public places with large amounts of people or from a car driving around a neighborhood would be two easy examples of ideal places to launch this exploit.

The exploit was recently discovered by Nitay Artenstein during the Black Hat security event in Las Vegas. Artenstein has a scheduled talk about how he and his team found the exploits. The talk also goes into details about other remote exploits for android and ios devices.

Security threats are constantly evolving and it is a good practice to keep your connected devices up to date with the latest security patches.

How to fix cldflt service error 7000

Recently I’ve been playing Player Unknowns battleground but getting some random freezes with the game and my OS (windows 10) so during some troubleshooting I cam across a couple errors in the windows event viewer I’ve decided to troubleshoot and remediate in the event it has a direct effect on my gaming experience.

One of the first I came across was cldflt service error 7000. The cldflt service is related to OneDrive and more specifically carries the description: “Cloud Files Mini Filter Driver.” I had recently uninstalled OneDrive on this particular system so my assumption is that this service is still looking for it or was not removed during the uninstall.

Here is the full error from the event log:

Log Name: System
Source: Service Control Manager
Date: 7/4/2017 2:10:53 PM
Event ID: 7000
Task Category: None
Level: Error
Keywords: Classic
User: N/A
Computer: INTELNUC
Description:
The CldFlt service failed to start due to the following error:
The request is not supported.
Event Xml:
<Event xmlns=”http://schemas.microsoft.com/win/2004/08/events/event”>
<System>
<Provider Name=”Service Control Manager” Guid=”{555908d1-a6d7-4695-8e1e-26931d2012f4}” EventSourceName=”Service Control Manager” />
<EventID Qualifiers=”49152″>7000</EventID>
<Version>0</Version>
<Level>2</Level>
<Task>0</Task>
<Opcode>0</Opcode>
<Keywords>0x8080000000000000</Keywords>
<TimeCreated SystemTime=”2017-07-04T18:10:53.740852700Z” />
<EventRecordID>6929</EventRecordID>
<Correlation />
<Execution ProcessID=”728″ ThreadID=”1152″ />
<Channel>System</Channel>
<Computer>INTELNUC</Computer>
<Security />
</System>
<EventData>
<Data Name=”param1″>CldFlt</Data>
<Data Name=”param2″>%%50</Data>
<Binary>43006C00640046006C0074000000</Binary>
</EventData>
</Event>

So the fix is pretty basic, simply open your registry editor (if you are not familiar with how to do that, backup your system before proceeding) Then navigate to HKEY_LOCAL_MACHINE\SYSTEM\ControlSet001\Services\CldFlt and change Start from the default value of 2 and change it to 4. Reboot your computer.

This worked fine for me and I no longer see any errors in the log. Now I can continue on troubleshooting the game 🙂 Comment below if this worked for you or if you have any other suggestions on how to fix this error.

HomePod Overview and WWDC17 Updates

Today Apple kicked off its annual 3 day developer conference with a couple nice announcements: an update to the iMac Pro, a peer to peer payment system similar to venmo, and HomePod a rival to Amazon Echo and Google Home.

Let’s first talk about the new iMac updates. It looks like Apple is all in on VR (virtual reality) and is building current and future hardware updates tailored to supporting VR graphics.

This fall Apple will be releasing a new version of it’s OS called: “High Sierra” some of the features include better facial recognition in the Photos app, some new filters as well and will be synchronized across devices.

Apple is also porting over it’s Apple File System to macOS, which isn’t a huge change but has some improvement to duplicating files and a higher quality video compression.

From a hardware standpoint Tim Cook was quoted saying: “That iMac Pro really is bad ass”

In iOS 11 you will now be able to make peer to peer payments through iMessage. Very similar to how you would with Venmo or Square Cash. There will also be support for multi room audio and a feature to help silence notifications while you are driving.

Now on to the HomePod…

Apple HomePod
Apple HomePod

This new device which will compete with Amazon and Google will come in two colors: white and black, and starts at $349 retail. While the HomePod looks like a microphone itself, it features 6 microphones in order to pick up on every command.

Twitter users have been comparing it to a ball of yarn…


My Take: While the HomePod is cool, Amazon and Google already have a leg up in the  race. Apple will need to catch up to gain market share and hopefully have great integration with Siri across all devices.

Spectrum vs AT&T Uverse

As a long time bright house customer I have been satisfied with their service and have enjoyed (for the most part) their internet speeds. We have had some hiccups and brighthouse has been good about coming out multiple times to address the issues however, my interest lies in reliability as I often work from home and need consistency.

I recently discovered that a fiber box was installed directly in my front lawn with service from ATT. I’ve heard some good things about fiber and the 1Gbps (940Mbps) internet speed and the distance to the box to my house also seems appealing.

I currently leverage brighthouse (now spectrum) with their lighting internet 200 bundle with basic tv for 4 tvs. This delivered (on a good day) 200Mbps internet. Out of curiosity I went ahead and checked my speeds as I was writing this blog and I am currently only getting 113 down and 15 up. So as I’m used to with bright house, I’m paying for more than what I am getting. There is a good python script speed checker that you could install onto a raspberry pi and have it routinely check speeds for you on github. It also tweets out the speeds if they are lower than what you are paying for. I may try that once I finish this blog.

I have been paying about $199 a month for spectrum after all taxes and service fees are included. The actual cost of the internet is $107 which is what I am really concerned with. I don’t watch much TV in my free time, so paying another $100 for TV service on top of internet is a bit silly to me. So I thought it may be beneficial to post a spectrum vs at&t post and see if I can reduce or enhance my services.

At first glance going to the ATT site is a bit confusing as they have multiple internet, mobile solutions, and a mixture of directv and uverse tv offerings. It took me a bit to narrow down which services even being a bit tech savvy and somewhat educated on their latest offerings. I finally found what I needed by using a services locator tool where I plugged in my home address and it displayed what was available to me.

DirectTV seemed to be pushed as their go to TV solution, I have however used that service in the past and enjoyed the programming but the service did not fair well during our summer storms in Florida. I opted to go with the uverse programming. I also noticed that the digital uverse tv service also removed a data cap on the fiber internet. As I mentioned before the TV service isn’t a big deal to me, but removing the internet cap makes up for it.

I finally found the internet speeds, and it looks like 1Gbps was available as I was hoping it was. The cost by itself was only $90 ? Wow! If i compare spectrum vs att, we are looking at brighthouse charging $107 for 200Mbps and ATT charging $90 for 1000Mbps. Wow that’s 5 times more speed for $17 cheaper a month. That’s a savings of $204 a year, on just internet.

At this point I was pretty sold but was convinced that there were some hidden charges or fees I wasn’t seeing. I went ahead and started to checkout using their eCommerce page, found a TV and internet package for four TV’s and the monthly cost was only $130… they waived all of the activation fees, and the setup and installation fees.

So I’m now only paying $130 a month for the same or better (yet to be determined) TV service, and 5 times faster internet. That’s a savings of $828 a year! I get the services hooked up on Thursday and will do a deeper dive on what I like and don’t like, but at this point it appears to be a no brainer.

The only downside I noticed was that these prices were only for 24 months. After the 24 months the prices raise. I may at that point do another comparison of att vs spectrum again and see if I am in fact getting the better deal, but until then ATT wins my business for now.

EMC Unity Makes Flash Storage Simple

If you were looking for the announcement of “VNX 3” at EMC World you may be disappointed… but you shouldn’t be. Instead what you will find is an all new, built from the flash up, midrange storage device. EMC Unity was built with four key and very clear goals: simple, all flash, rich data services, and affordability.

Unity provides the most complete set of data services on the market from day 1, including all of the features necessary for deep VMware integration, complete Microsoft integration, and access to all of the latest data capabilities: VASA, vVOL’s, SMB3, NFS, CIFS, and more.  With all of these advanced features and functions it is tough to keep everything simple, but EMC has knocked it out of the park with a very easy to use HTML5 interface. NO MORE JAVA !!! From one simple interface you can create protection schedules for file, block, and vVOLs using unified replication and snapshots.

Sure the simple interface is just my opinion, but EMC also took it a step further and ran some third parties tests with Mad Pow. They compared the interface to a some others in the market and were blown away.

“EMC is setting the standard for storage simplicity” – Mad Pow

EMC Unity EMC World

EMC Unity was designed for all flash but also has a hybrid option as well and the ability to tier to the cloud. With the all flash configurations you can get up to 80TB in a single 2U shelf. For the ultimate in options you can also have a virtualized Unity appliance in the data center to serve as replication target or to deploy for dev test scenarios.

emc unity flash optimized design

When I say that EMC Unity is designed for flash, the above image demonstrates the key differences in legacy hybrid arrays trying to act as an all flash array. Typically the NVRAM in legacy hybrid arrays is small and fills up quickly. With Unity you can utilize the full system cache, that also scales as you add more flash drives. Eliminating the NVRAM bottleneck.

With the all new storage architecture, some new space efficient features are included. No Storage left behind, meaning no reserved space for snapshots and free space is returned back to the pool when snapshots are removed or deleted. Built in copy data services allow fast and space efficient, pointer based snapshots. Replication is just as efficient, only sending data based on snapshot deltas.

The best part about all of these features I have described is the simplicity. No longer do you need an entire team to manage storage. You can now do it with your eyes closed… well you might have to peak to see the screen 😉


EMC World Biohacks for Hangovers

As we get ready for EMC World 2016 we are already anticipating long days of sessions and networking as well as long nights of social events and just vegas in general. I was recently listening to a Tim Ferriss podcast on he survived the SXSW conference and it appeared very relevant to a week at EMC World.

Let’s get into it! If you have ever “time traveled” while drinking you probably experienced a lack of vasopressin. Vassopressin is a hormone that is related to short term memory and is suppressed when ethanol (alcohol) is introduced into the body. In order to reduce the effects of this here are 4 things you can do during EMC world to help reduce the after effects of late night drinking:

  1. Water – your best rule of thumb is to drink at least one glass of water per alcoholic drink. Maintaining hydration is your biggest key to waking up without a headache.
  2. Guacamole – Drinking depletes the body of necessary potassium, and avocados are rich with it. Avocados are also full of fiber, healthy fats, and B6 vitamins to help get your muscle function back on track and keep sodium at bay.
  3. Clean Drinks – You are what you eat and you feel what you drink 😉 Tim recommends drinking a “NorCal Margarita”  which is a lightweight way to drink a margarita without sacrificing the alcohol. A typical margarita packs in 250-300 calories per drink, along with sugars, high fructose corn syrup, and a ton of artificial ingredients in the margarita mix. A NorCal margarita has only 3 ingredients: tequila, club soda, and lime.
    • The tequila being used is fermented agave juice, both gluten and starch free
    • The lime juice blunts the insulin response of alcohol
    • The carbon dioxide bubbles in the club soda help to deliver the ethanol to your blood stream quicker, thus you drink less with the same effect
  4. Burnt Toast – If you are really feeling rough, burn some toast in the morning and scrape the burnt toast into some yogurt. The carbon from the burnt toast will help to absorb alcohol and other toxins in your body to help you get back on your feet.

Sleep also helps, so make sure you “nap” when you can. I hope those tips help you experience EMC World to its fullest, and if you have any other tips or suggestions feel free to comment below and make sure to share this article with your co-workers.

VxRack Nodes

I’ve been asked quite a bit lately on VxRack node types and options so I wanted to go over what is available and some of the options. First lets start off with the VxRack 1000 Flex options. At a high level there are 3 vxrack node types that can be configured in a VxRack solution; Dense Compute, Dense Storage, and a Storage only node.  Each of these nodes have a couple variations in order to properly size and accommodate various workloads.

VxRack Node Types 1000 Flex
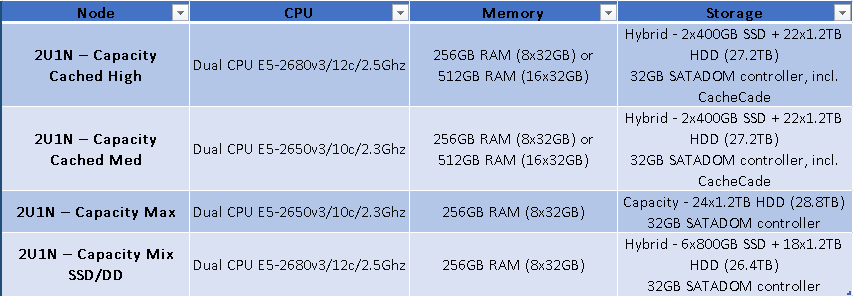
VxRack Node: Dense Compute

vxrack node dense compute

VxRack Node: Dense Storage

vxrack dense storage node


Winning Powerball with Big Data

If you are looking for the magic formula to win the lottery you have come to the wrong place. However today we will have some fun with some of the Powerball’s previous winning numbers so we can better decide on how we want to make our picks for the upcoming drawing.

Before we get started lets take a step back and get a basic overview/understanding of how powerball works. Drawings are held Wednesday and Saturday evenings at 10:59 p.m. Eastern Time. The game uses a 5/69 (white balls) + 1/26 (Powerballs) matrix from which winning numbers are chosen. Each play costs $2, or $3 with the Power Play option.

I also want to note that there was a format change on October 4, 2015 which we will want to keep in mind when calculating powerball winning historics. The white-ball pool increased from 59 to 69 while the Powerball pool decreased from 35 to 26. The new setup was designed to help create more winners and also more rollovers. Which is why we are now looking at a record estimated $1.3 billion dollar prize.

So the more and more I’ve researched different ways to predict powerball numbers using big data I was able to come up with two important facts that will save you some time and heart ache.

  1. The Powerball numbers are drawn randomly
  2. As humans we pick numbers non-randomly

About 70% to 80% of powerball purchases are computer picks and about 70% to 80% of winners are from computer picks. [source] So if I was going to play I would buy mostly randomly generated tickets based off of a computer; but possibly play one based off of historical data. I built this excel spreadsheet [download] with the data from powerball.com on all historical winning numbers back to 1997. So download and enjoy (if you win I would expect a small donation 😉 )

In the excel spreadsheet you notice I have setup 3 tabs. The first tab is a random number generator for each of the white balls and the powerball in the event you don’t trust the powerball computer picks.

generate random powerball numbers

The second tab is a table of all of the past winning numbers in the order they were picked. This would be a good data source if you wanted to utilize some data processing to calculate odds and trends.

The third tab is the frequency of each winning number called and broken down by white balls and power balls. Here are some screenshots:

powerball-frequency-2
powerball-frequency

As I started crunching the numbers and odds I realized that the overall odds of random are already so high that if I want to actually play the powerball my best bet is to just let the computer pick the numbers. The moral of this unfulfilled blog entry is that we pick numbers non randomly and the powerball is picked at random.  So if you want to win, make sure you do it randomly 😉

Let me know your thoughts on the excel data and how else we could make the numbers more useful in the comments section below.

Windows 10 IoT Raspberry Pi 2 Setup Tutorial

After researching tons of use cases and features of IoT devices and machine learning techniques, I decided to go ahead and purchase my first Raspberry Pi 2. I primarily want to explore setting up sensors and streaming that sensor data to various cloud providers.  I’ve also looked at a couple projects dealing with some mesh networking that looked interesting, but for this project we will be setting up Windows 10 IoT Core on the Raspberry Pi.

So to get started with Windows 10 IoT core you will need either a Raspberry Pi 2 or MinnowBoard Max. We will obviously be using a Raspberry Pi 2 in this tutorial. If you haven’t already purchased a RPi2 I recommend purchasing a kit with power supply. Luckily I had a micro USB cable available and an AC adapter. You will need at least 600mA at 5V to be up and running. You will also need a microSD card. I went with a 16GB card so we will have plenty of space, but an 8GB card should be enough for a minimal setup.

Download Windows 10 IoT core

Once you have your hardware in place, download the setup tools from http://ms-iot.github.io/content/en-US/Downloads.htm .  You will see “Windows 10 IoT core for Raspberry Pi 2” go ahead and download the ISO file called “IOT Core RPi.ISO” You can mount the ISO or open it with an archiver software such as WinRAR. Inside the ISO is an MSI file to install the components. Go ahead and install the package. Note: There are some tools in this package to make this much easier if you are using Windows 10 already for your operating system, but I am not so we will be using some 3rd party tools instead of the native Microsoft Tools.

Now that you have the software installed, you will see Microsoft IoT in your start menu or program files, with 2 executables.  One is called WindowsIoTCoreWatcher which is a lightweight program for viewing all of your IoT running machines. The other is called WindowsIoTImageHelper which will help you flash your microSD card.

Windows IoT Core Image Helper
Windows IoT Core Watcher

From what I have read these applications are supposed to only work or are only supported when using the Windows 10 OS. I’m currently using Windows 7 and both seem to launch fine. I’m going to go ahead and try using the flash utility but will also list the steps for an alternative way to flash the microSD card.

Flashing the microSD card with Windows IoT Core Image Helper

So if you see the screenshot above it looks like the microSD card is detected, but only showing 7Mb. Even though this is a 16GB card, I’m going to push forward anyways and see what happens. This utility is about as easy as it gets; first select your microSD card and then select the image file. The image file is located here: C:\Program Files (x86)\Microsoft IoT\FFU\RaspberryPi2\flash.ffu (unless you chose to install into a different path) . Once you have the correct settings, simply click “Flash” and you will see a command prompt appear with the status of the flash.

Windows IoT Core Image Helper Progress

After the microSD card is flashed, you can now insert the microSD card into you Raspberry Pi 2 and boot.

Windows 10 IoT Configuration

Once the RPi2 is booted with the new image, you will see the windows 10 logo and a typical boot screen. Once the OS is finished booting you will have an option for language. I simply selected English and that was all you needed for configuration. Now since I had my ethernet cable plugged into the device is picked up an IP address and was given a device name of “minwinpc” by default.

Windows10 IoT Core Raspberry Pi 2 Screenshot

Once the device is up and running you have two tabs, one is a device info tab (shown above) and the other is a tutorials tab. You will also notice that if you launch the WindowsIoTCoreWatcher on the same network you can now see your device.

Windows IoT Core Watcher miniwinpc

If you right click you have four options available: Copy Mac Address, Copy IP Address, Web Browser Here, and Open Network Share. Pretty simple ! You are now able to develop on your windows 10 iot raspberry pi 2 device ! If you have any questions or thoughts, please use the comments below.